Celestial navigation: how to determine your position by stars and other space objects
Today, we are going to consider the basics of celestial navigation, a method of understanding where you are on planet Earth using the position of the stars, planets and other space objects.
As easy as ABC
Celestial navigation historically served to determine the position of ships on the high seas, but in the era of GPS it has become redundant as it has been taken over by satellites.
This however does not mean that the stars are no longer used to determine a location on the ocean. The stars remain a backup for navigation of ships in case of GPS problems, and there is an army of keen sailors who still practice it for pleasure and as a sport.
Just imagine being able to navigate the seas almost the same way as your fellow sailors did hundreds or thousands of years ago. Instead of relying on electronic devices, you can apply the skills of observing stars and other celestial bodies which have guided mariners since the beginning of recorded history.
You might think that celestial navigation requires advanced knowledge of mathematics and geometry. In fact, all you need to remember from the school curriculum is how to add and subtract numbers and the fact that angles are measured in degrees and are usually denoted by the degree sign (“°”). A sextant and nautical charts will do the rest.
Do not let the word “sextant” put you off. Trust us, this is the only complicated word in a rather straightforward method of fixing your position.
Bruno Martins / unsplash
Celestial navigation basics
The Earth’s surface is divided into imaginary lines used for locating certain points and positions. The lines which stretch across the globe from the South to the North Pole are called longitudes, while latitudes are lines drawn parallel to the equator.
The combination of longitude and latitude in degrees provide the coordinates that are used in navigation of any kind. Let’s learn how to find them.
Celestial navigation is based on the ability to follow celestial bodies, such as the Moon, Venus, Mars, Saturn and Jupiter and some of the brightest stars. However, determining your current position using the sun is the most common practice as seafarers will often do this in broad daylight.
So, imagine that the sun rays that reach the Earth are always parallel to each other. This is not entirely true, but we will accept this rather simplified view of the world for the time being.
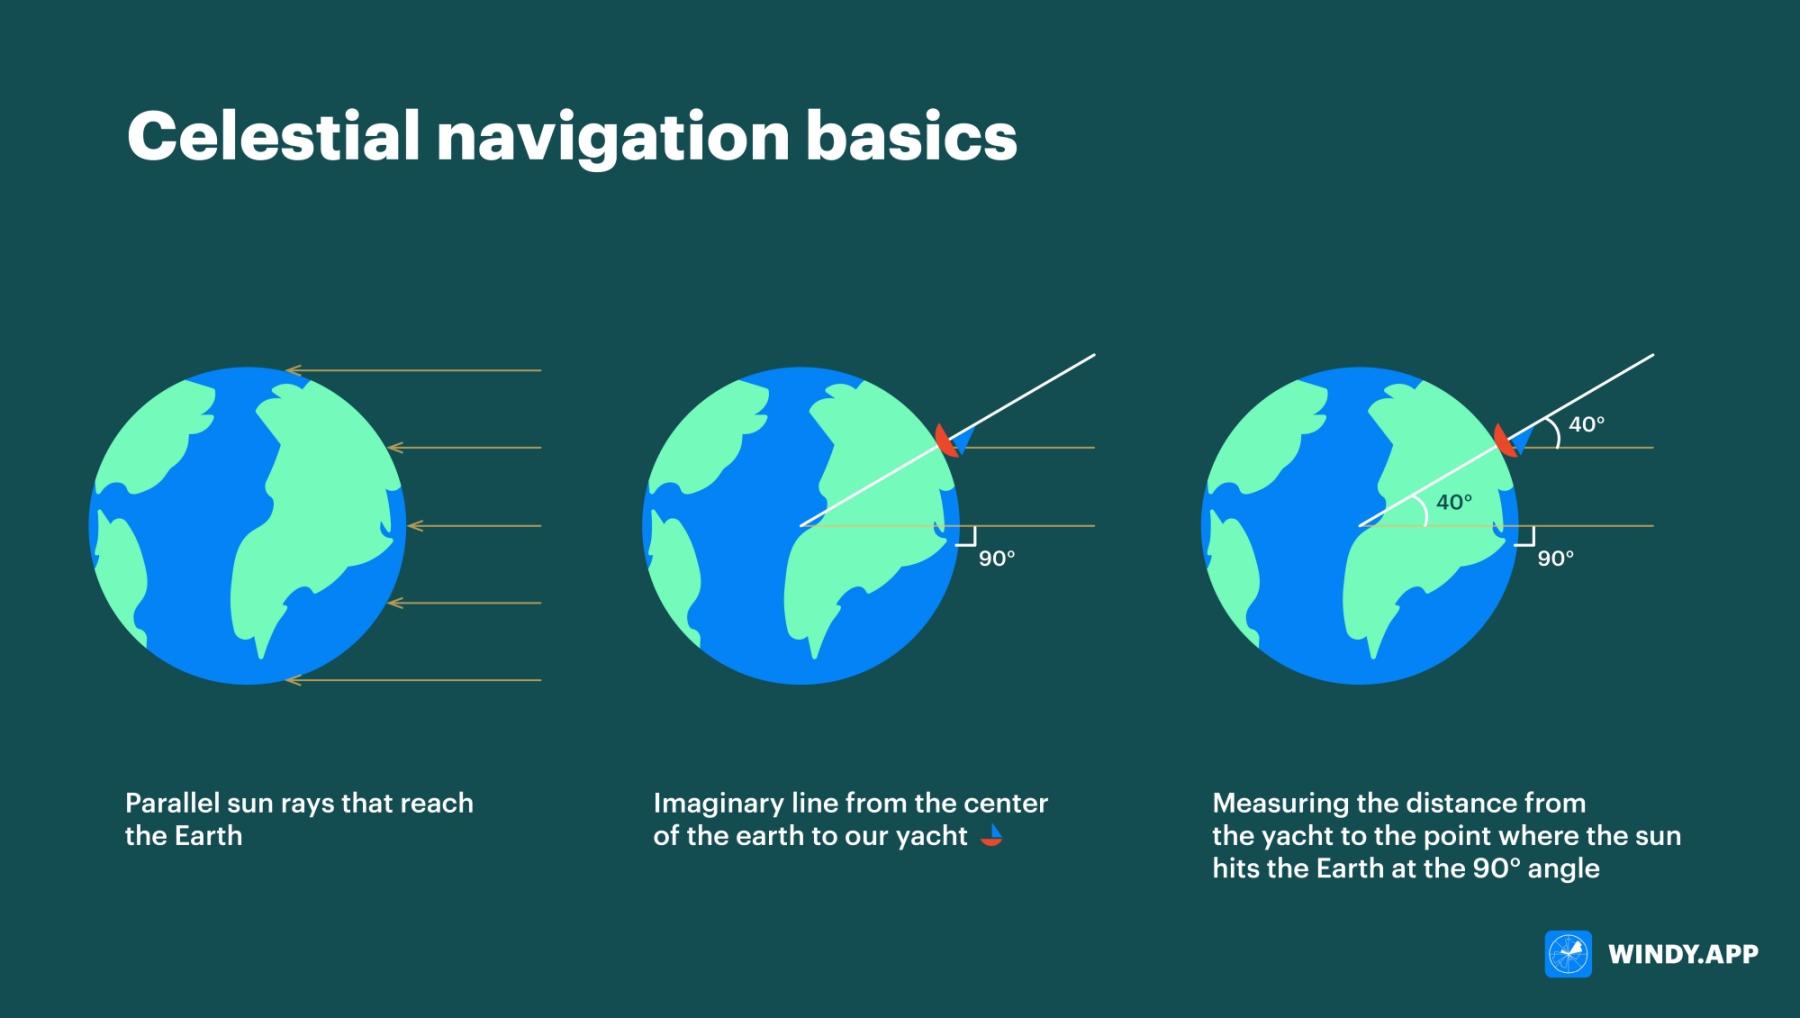
Celestial navigation basics. Illustration: Valerya Milovanova / Windy.app
And somewhere on the earth’s surface there is always a point (constantly changing its position due to the rotation of the planet) through which a sun ray could pass directly to the center of the earth. A person standing at this imaginary point would see the sun at a right angle (90 degrees) directly above him.
Now imagine that somewhere miles away we are drifting on a yacht with our GPS broken, and we see the sun from a different angle but we are desperate to get our bearings. How do we do this?
Step one: on the yacht, find the angle between the horizon and the position of the sun, as well as the coordinates of the point where the sun “is shining” into the center of the earth (as described above) at that time.
The angle can be quickly and easily found with the help of a nautical sextant, while the information of the position of the sun will come from nautical charts which are worth taking on any voyage (the charts are also available online, but paper charts will come handy in case there is no Internet connection).
Step two: measure the resulting angles. Let’s say the sextant showed 50 degrees. It turns out that the angle between an imaginary straight line extending from the center of the Earth to our yacht and the angle of the sun above the horizon will be 90°- 50° = 40°.
Hang on! Why did we draw a line to the yacht? Why did we do this calculation? The answer is simple: these two angles are equal because the sun rays are parallel.
Step three: knowing the angle between our yacht and the point where the sun is now “looking” at the center of the Earth at a right angle, you can measure the distance from the yacht to this point.
One degree equals to 60 nautical miles (nautical miles, not ordinary miles, are used because it is convenient to measure them in degrees and nautical mile is 1.832km). This means that the distance will be 60 * 40° = 2400 nautical miles or 4444 kilometers.
We are halfway through, and the hardest part is over!
We just have to draw circles now
The data that we’ve just received is, of course, useful, but the distance to a point does not tell us anything about our longitude and latitude.
In essence, it means that we can be 4444 kilometers around the very point that we found in the charts. Therefore, all we can do for now is draw a circle on the globe (an ordinary map won’t work). We can potentially be at any point on this circle now.
Guess what will happen next? That’s right, you need to draw more circles!
Essentially, we can again use the sun as a reference, for example, a couple of hours after the first measurement. We measure the angle from the horizon to the sun using a sextant, again look at the charts and find the right point, calculate the distance to it and draw a new circle.
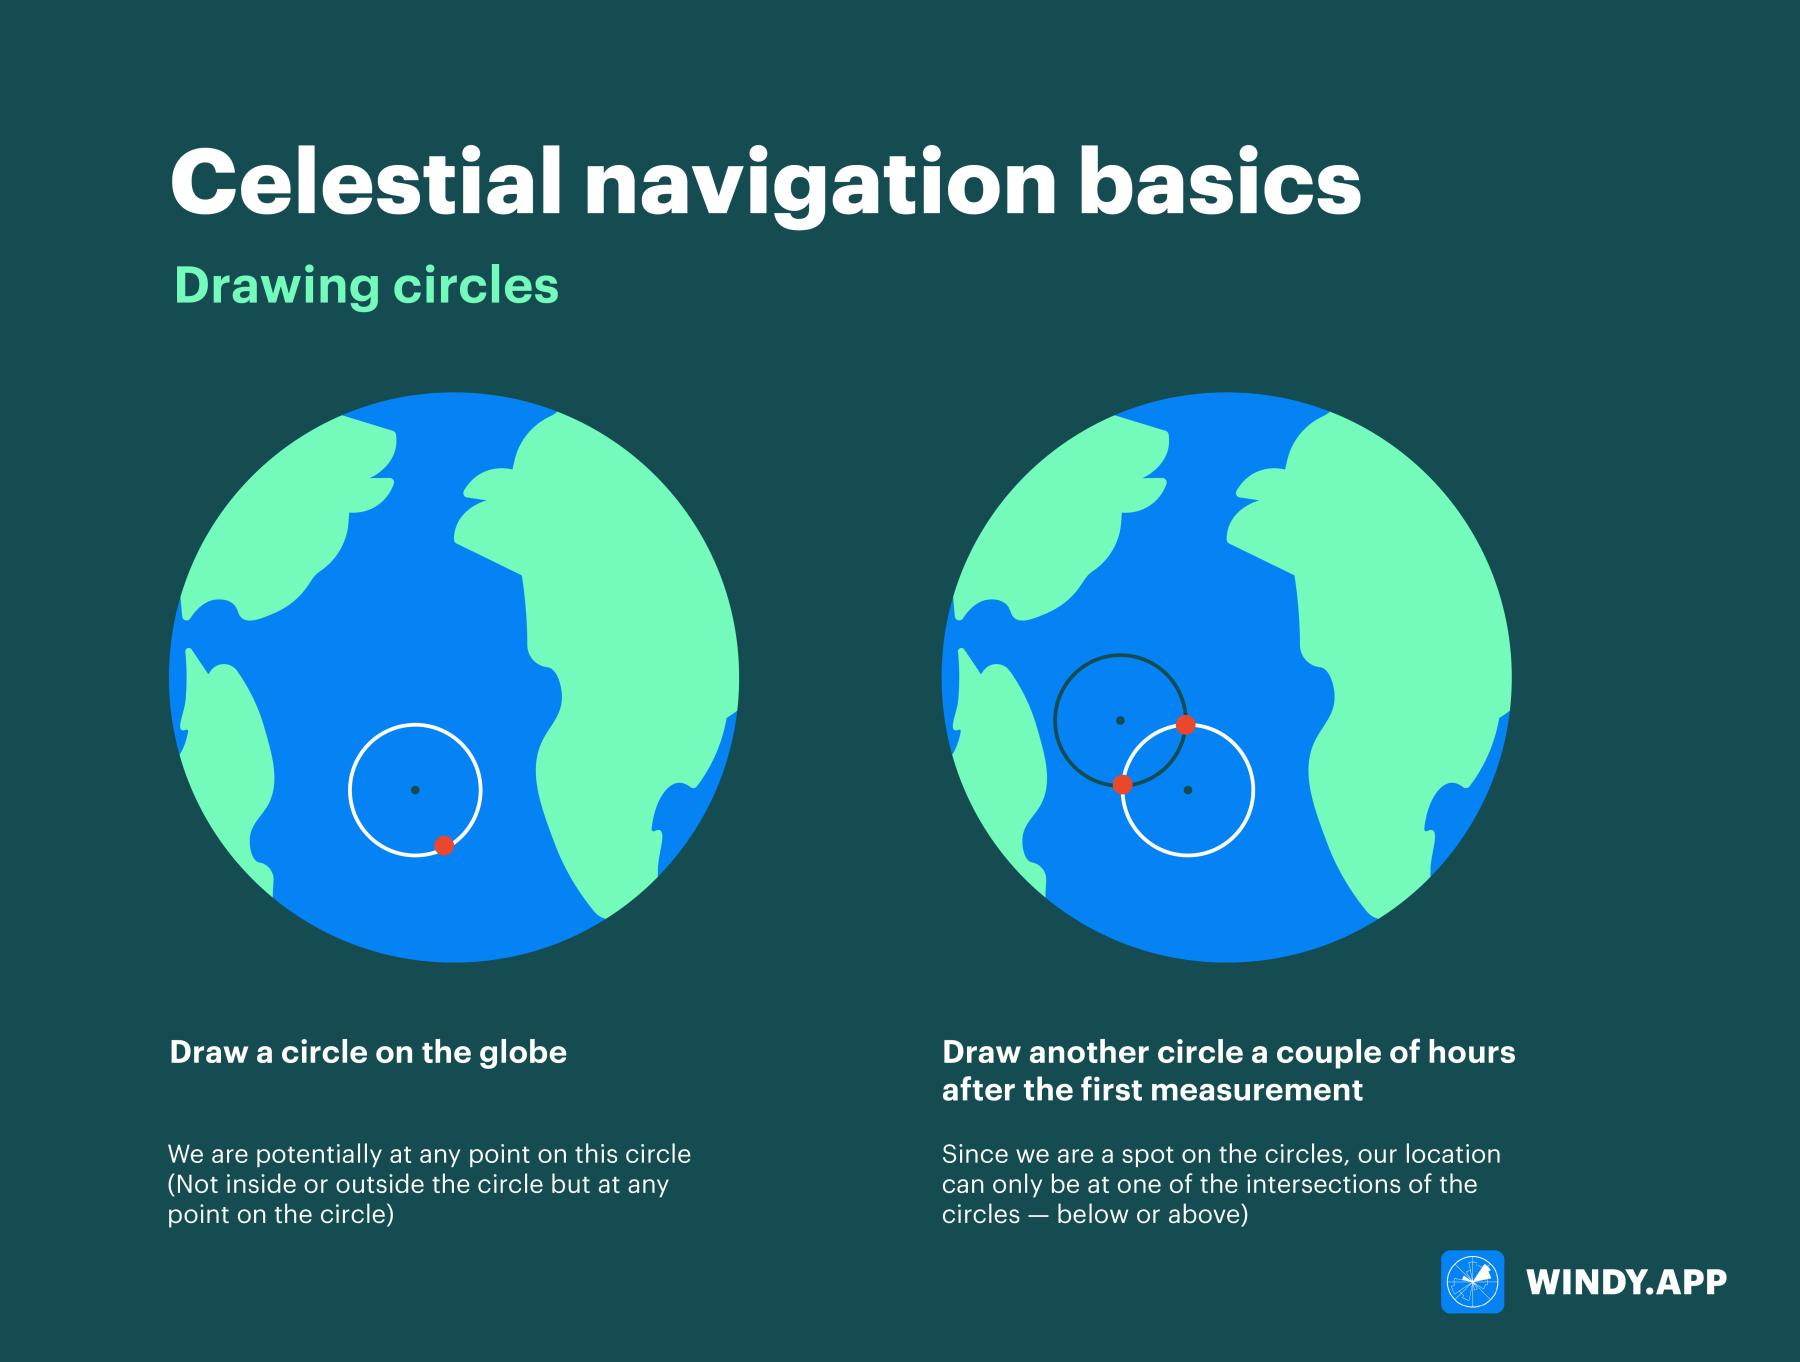
On a real globe, our circles from this angle will look elongated. Illustration: Valerya Milovanova / Windy.app
Since we are a spot on the circles, our location can only be at one of the intersections of the circles — below or above. In practice, these intersections are geographically very far from each other.
You can select other celestial bodies if there is data for them in the tables, and draw more circles for greater accuracy.
Okay, what if we don’t have a globe and we can’t draw circles? In this case, we have to make some rather weird assumptions...
Imagine the Earth is flat
To perform the next trick, we should assume that the earth is flat. The point is that we will be working on smaller scales, where the curvature of the Earth is of lesser importance.
This is where it gets more interesting. We should also guess our longitude and latitude, and put this point on a flat map. By means of nautical charts, we have to determine the point where the sun “is looking” at the center of the Earth at that very moment.
Knowing the coordinates of our assumed position and the distance to the real “solar point”, we can calculate what angle our sextant would show between the horizon and the sun if we really were in that assumed position.
There is a simple formula for this: 90 degrees minus the distance between our assumed position and the “solar point”. We can easily find out this distance, since the estimated longitude and latitude are known.
Having done this, we can compare the “readings” of our imaginary sextant with the readings of our sextant in the place where we are. If they coincide, we have guessed our position correctly!
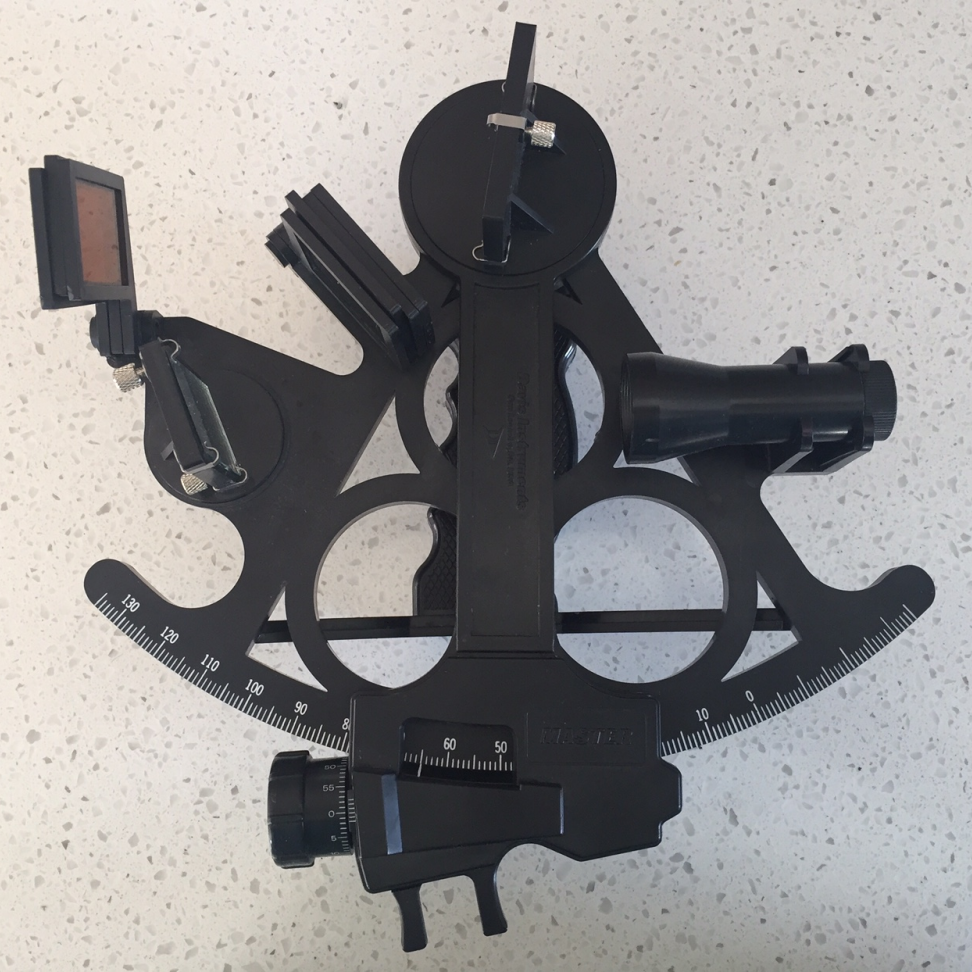
This is a nautical sextant
The principle of double reflection is used. The first mirror is lined up with the horizon, while the second must first be pointed at a celestial body, then moved to coincide with the horizon using the movable arm below. When the celestial body “touches” the horizon, you can write down the “sight” or measure of the angle. Usually one person takes the measurements, while the other records the exact time and angle. It is extremely important to look at the sun through special filters which every modern sextant is equipped with. Otherwise, you can damage your eyes!
It is highly likely that the readings will not match. In this case, we will repeat the same thing as with intersecting circles on the globe, but this time we will draw intersecting lines on a flat map.
Now we have “fixed” our assumed position, let’s check how much the readings of the real and “assumed” sextants vary. Let’s assume that the sun is at 42 degrees above the horizon, and our real angle is 41, we need to “move” our assumed position by 1 degree from the sun (the smaller the angle, the farther from the sun, and the larger, the closer to the sun).
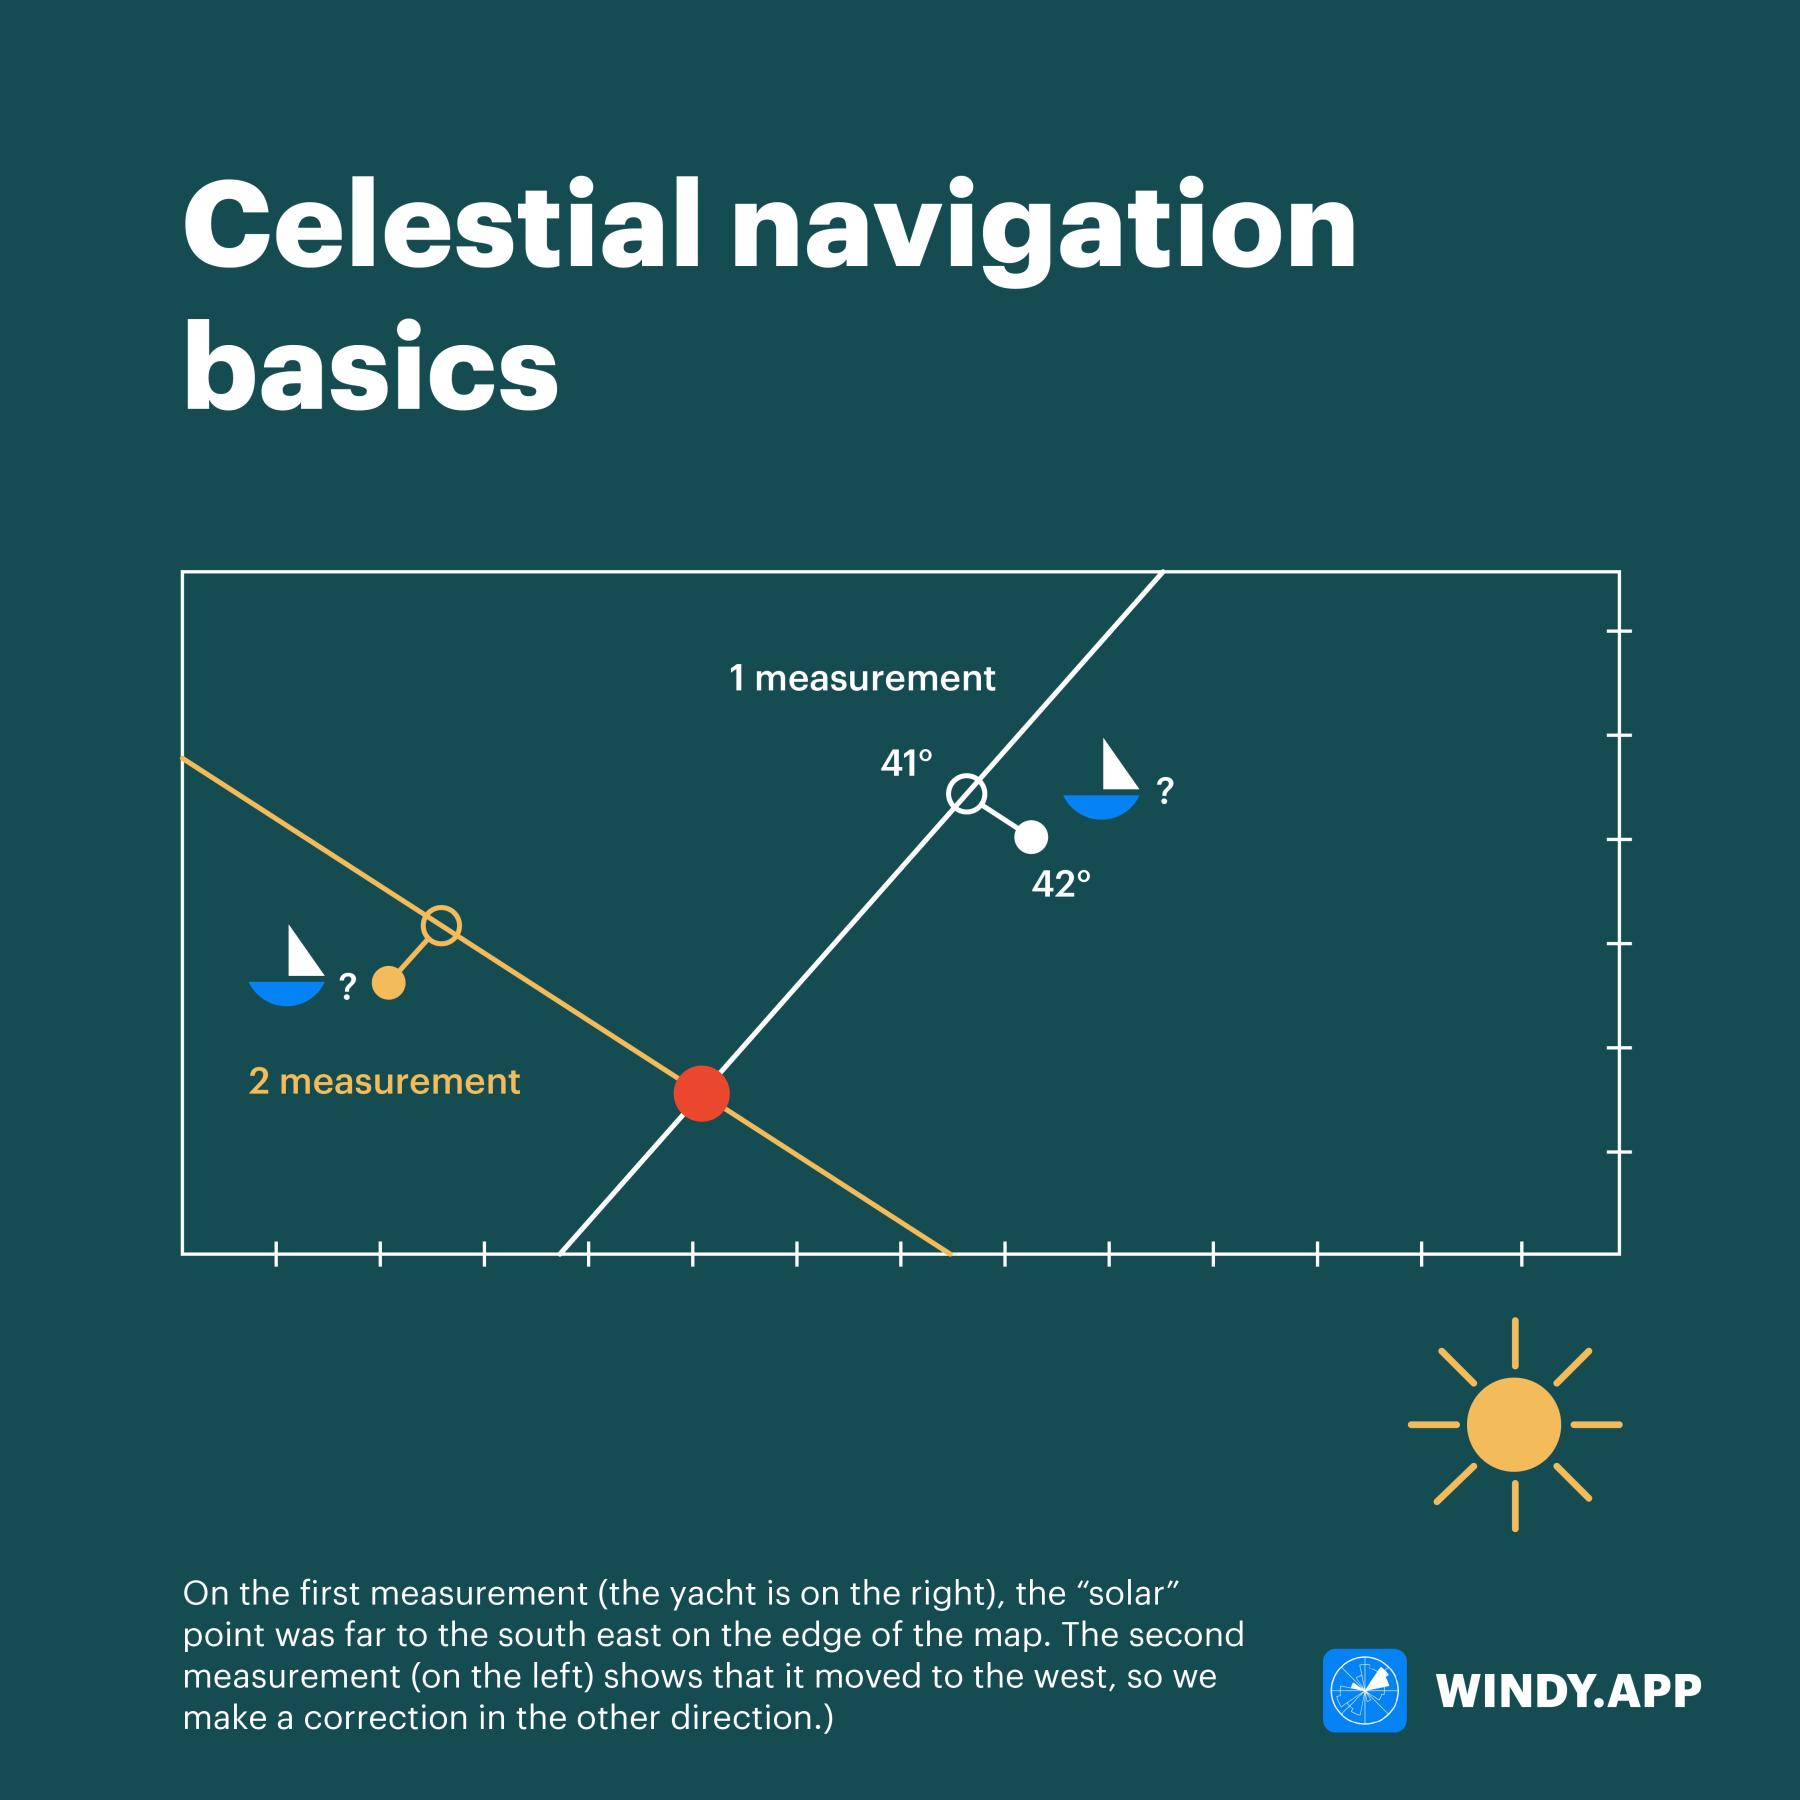
On the first measurement (the yacht is on the right), the “solar” point was far to the south east on the edge of the map. The second measurement (on the left) shows that it moved to the west, so we make a correction in the other direction. Illustration: Valerya Milovanova / Windy.app
Having done this, we draw a line perpendicular to the direction of the sun. In fact, this is part of the circle that we would draw on the globe, but the small scale of the map allows us to draw it as a line.
After some time, we carry out the same measurements and correct the sextant data for the second assumed position (in the picture, it’s on the left), which we also randomly put on the map along with the line.
If two lines intersect, our yacht is approximately at the point of intersection. If not, we must have made a mistake and more lines are required to find this intersection. More lines mean more precision: if 3 lines intersect, our position is probably somewhere inside the triangle at the intersection.
Bingo! You have an approximate latitude and longitude with an average accuracy of 1 to 5 square nautical miles, if you’ve done it correctly. In theory, you can achieve an accuracy of 0.1 square mile, but in practice this is rarely achieved.
Of course, this is not everything you need to know about celestial navigation: you need to learn how to read tables and use a sextant, take into account the movement of the yacht and make other adjustments to the calculations. But if you could get your head around the simplified concepts mentioned above, you know how celestial navigation works.
Text: Windy.app team
Cover photo: Lucas Marconnet / Unsplash
You will also find useful
Where and when it is best to observe the stars
Where does the Aurora (Northern Lights) come from
Why do we see halo — a circle around the Sun
Latest News
Professional Weather App
Get a detailed online 10 day weather forecast, live worldwide wind map and local weather reports from the most accurate weather models.
Compare spot conditions, ask locals in the app chat, discover meteo lessons, and share your experience in our Windy.app Community.
Be sure with Windy.app.